
My wife Bonnie recently started on the task of cleaning out many years of collectibles that both she and her mom had accumulated. No small task, and she needed photos of all her items to post online.
If you sell or trade items online, like on Ebay, Esty or Facebook, you know that having a good photo of your item or craft is so important.
Fortunately, this is something most everyone can do themselves using some common household items and your camera phone. Today’s smartphone cameras are plenty good enough to produce great quality images of small to medium items. You don’t need to hire a pro, like me, in order to get good quality photos!
Producing a sharp, clear photo without distractions takes just a little bit of knowledge and some common household materials you probably already have.
First, you will want to create a background that provides minimal distraction. What I did was create what photographers call a “sweep” out of a tablecloth.
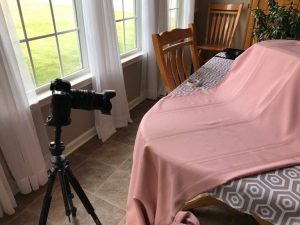
This is done by draping an ironed sheet or tablecloth over a box or something tall enough to create a background that flows into a foreground without a crease or seam.
White is very common in professional photos, but be aware that if you are using your phone, a white background may cause your items to record too dark, so something of a medium color and mid-tone will be a better choice. Likewise, a solid black background will cause your items to record too light. A DSLR camera gives you the ability to adjust the exposure to compensate, but this is more tedious to do with your cell phone camera and you want to avoid having to do more adjustments than necessary, Avoid anything with a busy pattern or print as this will distract from your item. A solid, mid-tone cloth or bed-sheet will be perfect.
Next, locate a window, or even better, a bank of windows in your home that will provide soft, even lighting. Be careful that direct sunlight isn’t falling on your windows during the time you want to shoot your pictures, as this will cause harsh shadows and streaks of sunlight on your items that will be very distracting. Shoot on an overcast day or pick a window that doesn’t have harsh, direct sun hitting it while you are shooting,
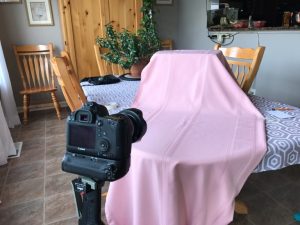
Position your table top setup so that your window is about 45 degrees left or right of where your camera will be. If you put the window directly behind you, you will cast your own shadow on your items when you take the photos.
Having the window to one side gives some direction to the light which provides what photographers call “modeling” or dimension to your items.
If your window is small, you may find that you get too harsh a shadow from your items on the background. If that’s the case, prop a large piece of white cardboard, or even newspaper on the opposite side of the window will reflect some light back and lessen any too-dark shadows. In our case, we had a bank of windows running the whole length of our breakfast room, so the light was soft and perfect.
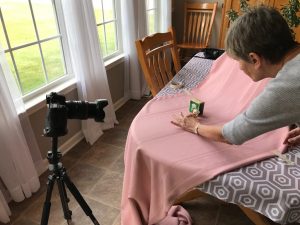 Position your items several inches to a foot out away from the background. This will help avoid shadows from your items falling on the background, and will also allow your background to fall gently out of focus, minimizing any wrinkles or textures in your fabric and focusing attention on your item.
Play with the positioning of your item to show it to its best advantage. If you get any glare or reflection on shiny surfaces, they can usually be eliminated by angling your item slightly left or right until they disappear. It’s important to make these adjustments while looking through your camera or at the screen on your phone as they may appear very different from what you see through the lens.
For most items that can stand up, it is also important to keep your camera or phone down perpendicular to your item. Shooting from too high an angle will introduce distortion that will be a problem. 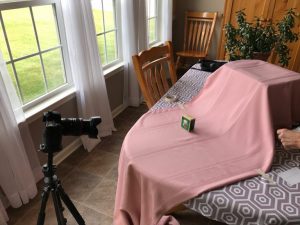
If your item can’s stand or be propped, you can always lay it flat and shoot directly down from over top.
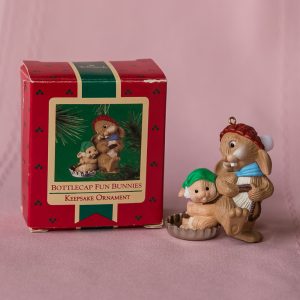
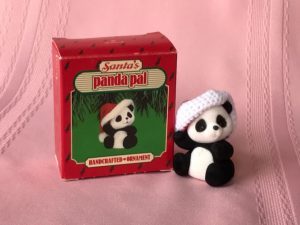
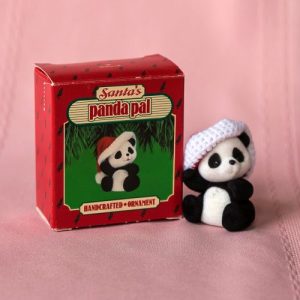
In my case, I shot these pictures with a DSLR on a tripod, because.. duh… I’m a professional photographer. But if you doubt your phone can’t take just as good a shot, I shot this one with both my Canon and my iphone… can you tell which is which?
BTW, one item well worth the investment is a tripod on which to put your camera or phone. It will allow for sharper photos, make centering and composing your photos much easier, and free your hands for making minor adjustments to your items. Small light weight tripods can be found for around $20-$30 online and are well worth the investment if you do a lot of this stuff.
.jpg)
I found this handy bracket that holds your smartphone securely and allows it to be attached to any tripod for about $7. Definitely nice to have, but not essential.
Hope these tips help you to present your items or crafts in their best light!


